What is OSGi?
Open Service Gateway initiative (OSGi) - A new Buzzword. :)
There are tons of Articles which could easily explain the what OSGi is all about but here is what i think and understand: -
"A Specifications for a Modular Approach to build a loosely Coupled and highly Cohesive kind of Architecture, which in itself defines a very clean and elegant way to expose its services"
Features: -
- The biggest Advantage of the OSGi is its Strict classloader policies, which make me relaxed that nothing unwanted is added to my application classpath. It is so Strict that even a Integrated OSGi Container cannot access Libraries of the Application Server.
- Real usage of META-INF's which gives me all information (its Dependencies/ Services/ Activators etc) regrading a Component (1).
- Everything in OSGi is a Bundle even if you want to use any external jars you need to convert them into Bundles and deploy with you Module. (2)
Getting Started: -
- Setting up Eclipse to Run OSGi: -
- Eclipse 3.5+ (I used eclipse-jee-galileo-SR2-win32, i.e. 3.5 Note: - Eclipse 3.4 has a bug of cyclic dependency
- Create a new Plugin project and Click next
- Give the name of your project as "FirstOSGiProj" and make sure that in "Target Platform" Equinox is selected. click Next.
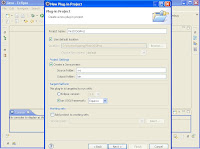
- By Default you don't have to change anyhting in this screen, But under "options" there is option to create Activator, which is by default Checked.
Activators are are those classes which act as a Initializers for your bundles.
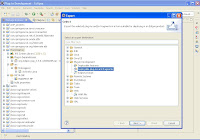
- next Screen shows you some of the existing Plugins which can be used to play around. At this point don't make any change and move forward. Click Next and then Finish and your Plugin project is created.

- The First which you see after your project is created is the Configuration of your Plugin defined in META-INF. If you are familiar with Eclipse Plugin's than definitely this screen is not a new Screen for you. but if you are not than also it is fine. It is preety Simple and anybody can understand it in few minutes.

- Open the Activator.java defined in
/src/firstosgiproj/Activator.java. It would be something similar to the below Screen. 
- Add the following Peace of code in the "start" method. System.out.println("Starting client1");
- Now Right Click on your project, click Run and select OSGi framework
- Now you will see the "Starting client1" in the Equinox OSGi Console. OSGi console is an interactive console, so type "help" and you will see number of available commands which can tell you more about OSGi runtime environment and many More things. I will leave it to the readers to explore more about this Console.
Eclipse 3.5 already has OSGi runtime (Equinox) which can be used to run the OSGi Bundles


This is the Simplest example what one can develop and understand about the OSGi from a very High level perspective. Though there are many more things which needs to be understand before one can use OSGi in production environment but at this point lets move Forward with our Initial Agenda and explore the Integration of Spring DM in Eclipse. I will publish more about intricacies of OSGi in further Articles
- Download and Install JDK6+
- Download Jboss6.0.M2 Appserver (OSGi will run only on Jboss6+)
- Download Jboss OSGi 1.0.0 Beta7
- Integrate OSGi Container with the Jboss6 (I did this with Equinox)
- After the above Steps your Jboss 6 App Server directory would exactly like the below Image
Note: Once you are done till here then run your Jboss6 and try 2 things in your Browser: -
- Browse Admin page of Jboss. Use admin/admin as username/ password
- Browse Admin page of JbossOSGI JbossOSGI. Use admin/admin as username/ password.
Proceed with further Steps if above 2 things work.

INFO: -
1. The "osgi" directory in the
2. The "osgi.deployer"Deployer directory in the
Deploy your first Bundle in OSGi: -
Now we will try to deploy our first Bundle in Jboss-OSGi: -
- In your Eclipse, select the "FirstOSGiProj", right click and select Export, once you click on Export you will see Export Plugin Screen
- Click next and define the location of your filesystem where your exported Bundle should be placed

- Now got the location where you have exported the Bundle. Copy the jar file (would be named as FirstOSGiProj_1.0.0.
.jar) and place it in " /server/default/deploy/osgi" and watch the Jboss Console.


You will see the SOP "Starting client1"
Also open the Jboss OSGi Console and you will see that your Bundle is deployed out there and is in running State

Integrating Spring with Jboss6-OSGi: -
- Download following bundles from Spring Enterprise reporsitory: -
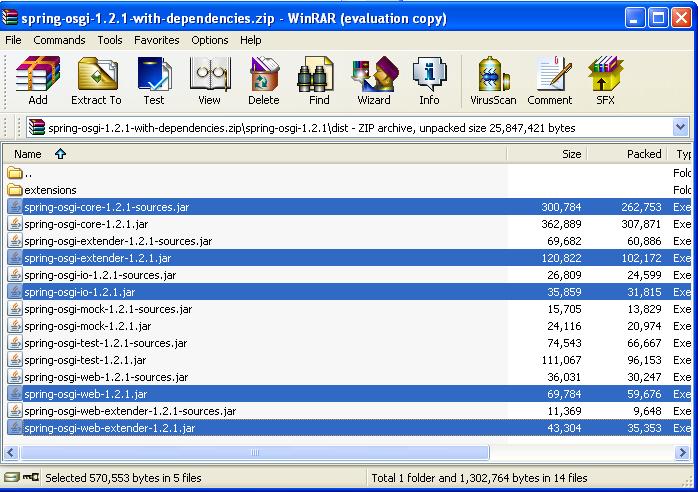
- Download Spring OSGi Bundle (spring-osgi-1.2.1-with-dependencies.zip) from Spring Community Downloads Once the download is finished. Extract the bundles highlighted in the below image from "spring-osgi-1.2.1\dist" folder.
- Download Spring Core framework 2.5.4 and extract following jar files from the "spring-framework-2.5.4\dist\modules" folder: -
- Now drop all the Jar files extracted in Step-1,2 and 3 to "
/server/default/deploy/osgi". - Bring Up the Server and you are done with the Jboss-Spring Integration. cool :)

spring-jdbc.jar
spring-orm.jar
../spring.jar
- Open your "FirstOSGiProj" in eclipse and add a folder "spring" under the META-INF folder.
- Define a following Package Structure

- In "api" define an Interface by name of "TestFirstOSGiService.java" and define 2 methods with the following signatures: -
- In "impl" define the implementation of both the Methods something like this: - package org.myService.service.impl;
- Define 2 XML files in spring Folder 1. firstOSGiService-osgi.xml and 2. firstOSGiService.xml
- Add the following Config in firstOSGiService.xml
- We are done with all configuration, so lets export the Bundle once again and drop it in "
/server/default/deploy/osgi" directory - Next Watch your Jboss Console and your Spring Service will Print Lot of information on the Console about all the Bundles Installed in Jboss OSGi Container

public String getName(String name);
public void setBundleContext(BundleContext context);
import org.myService.service.api.TestFirstOSGiService;
import org.osgi.framework.Bundle;
import org.osgi.framework.BundleContext;
public class TestFirstOSGiServiceImpl implements TestFirstOSGiService{
BundleContext context;
public String getName(String name){
BundleContext bctx=getBundleContext();
Bundle[] bundles = bctx.getBundles();
for (Bundle bun:bundles ){
System.out.println("symbName="+bun.getSymbolicName()+",State="+bun.getState()+",bunID="+bun.getBundleId());
}
System.out.println("My First Spring Service is Invoked");
return "hello from Server -->"+name;
}
public void setBundleContext(BundleContext context) {
this.context=context;
}
public BundleContext getBundleContext() {
return context;
}
}
//The above Prints the version and the Bundle name of all the bundles installed within the OSGi Context
Next we will define the Spring Config Files for these Services
Add following Config in firstOSGiService-osgi.xml
<?xml version="1.0" encoding="UTF-8"?>
<beans xmlns="http://www.springframework.org/schema/beans"
xmlns:xsi="http://www.w3.org/2001/XMLSchema-instance"
xmlns:osgi="http://www.springframework.org/schema/osgi"
xsi:schemaLocation="http://www.springframework.org/schema/beans http://www.springframework.org/schema/beans/spring-beans.xsd
http://www.springframework.org/schema/osgi http://www.springframework.org/schema/osgi/spring-osgi.xsd">
<osgi:service id="firstServiceOsgi" ref="firstService"
interface="org.myService.service.api.TestFirstOSGiService" />
</beans>
<?xml version="1.0" encoding="UTF-8"?>
<beans xmlns="http://www.springframework.org/schema/beans"
xmlns:xsi="http://www.w3.org/2001/XMLSchema-instance"
xsi:schemaLocation="http://www.springframework.org/schema/beans http://www.springframework.org/schema/beans/spring-beans.xsd">
<!-- Defining the Implementation of the OSGi Service and also Injecting following things: -
1. OSGi Bundle Context
-->
<bean name="firstService" class="org.myService.service.impl.TestFirstOSGiServiceImpl" >
<property name="bundleContext" ref="bundleContext"/>
</bean>
</beans>
Now lets see how the hibernate connects the Datasources exposed by the Appserver
- In your conf directory create a hibernate mapping file by the name of "sample.hbm.xml"
- Define a DTO class in hibernate.dto package and define 2 getters and setters "name" and "ID" (Same as what you have defined in your hibernate configuration file)
- Define a Interface by name of "MyHibernateTemplateAPI.java" in the "service.api" package and define following methods in this Interface
- Now define the Implementation of this Interface in "service.impl.hibernate" package
- So in the above steps we have defined the Hibernate mappings and the code which can insert the data into the DB Tables. Now next let's Inject the dependencies of Data-sources in the above piece of code, so that it can be a full fledged running Example.
- Define a Datasource in Jboss Appserver and name it as "myDS1"
- Now Modify your spring config (firstOSGiService.xml) and add the following configurations
- This is the right time that i should tell you about the restrictions within the Jboss
- Now Export your bundle and deploy it in the Jboss and restart Jboss and you are good to go.
- Next we will develop a client which invokes this service.
- Create a another plug-in project and follow the Steps defined in "Getting Started: -" section
- in your Activators Start method copy the following piece of Code: -
- Now just deploy this client plug-in in the same way the Spring Bundle is deployed and than just check the DB, you will see your parameter persisted in Database.
<?xml version="1.0"?>
<!DOCTYPE hibernate-mapping PUBLIC "-//Hibernate/Hibernate Mapping DTD 3.0//EN"
"http://hibernate.sourceforge.net/hibernate-mapping-3.0.dtd">
<hibernate-mapping>
<class name="org.myService.service.impl.hibernate.dto.NameDTO" table="NameTable">
<id name="id" column="Id">
<generator class="assigned"/>
</id>
<property name="name">
<column name="Name"/>
</property>
</class>
</hibernate-mapping>
public HibernateTemplate getHibernateTemplate();
public void insertData(String data);
public class MyHibernateTemplateImpl implements MyHibernateTemplateAPI{
HibernateTemplate hibernTemplate;
int count=0;
public HibernateTemplate getHibernTemplate() {
return hibernTemplate;
}
public void setHibernTemplate(HibernateTemplate hibernTemplate) {
this.hibernTemplate = hibernTemplate;
}
public HibernateTemplate getHibernateTemplate() {
return hibernTemplate;
}
public void insertData(String name) {
NameDTO nd= new NameDTO();
nd.setId(String.valueOf(++count));
nd.setName(name);
Session sess= hibernTemplate.getSessionFactory().openSession();
sess.persist(nd);
sess.flush();
}
}
Define a JNDi Template
>bean id="haJndiTemplate" class="org.springframework.jndi.JndiTemplate"<
>property name="environment"<
>props<
>!--JNDI connection parameters for looking up JNDI exposed by Jboss Appsever--<
>prop key="javax.naming.factory.initial"<org.jnp.interfaces.NamingContextFactory>/prop<
>prop key="javax.naming.factory.url.pkgs"<org.jnp.interfaces>/prop<
>prop key="javax.naming.provider.url"<jnp://127.0.0.1:1099>/prop<
>/props<
>/property<
>/bean<
Define Data Source
>bean id="dataSource1" class="org.springframework.jndi.JndiObjectFactoryBean"<
>property name="jndiName"<>value<myDS1>/value<>/property<
>property name="jndiTemplate" ref="haJndiTemplate"/<
>/bean<
Define Hibernate Session Factory
>bean id="mySessionFactory" class="org.springframework.orm.hibernate3.LocalSessionFactoryBean"<
>property name="mappingResources"<
>list<
>value<./conf/sample.hbm.xml>/value<
>/list<
>/property<
>property name="dataSource"<>ref local="dataSource1"/<>/property<
>property name="hibernateProperties"<
>props<
>prop key="hibernate.dialect"<org.hibernate.dialect.Oracle10gDialect>/prop<
>prop key="hibernate.show_sql"<true>/prop<
>/props<
>/property<
>/bean<
Define Hibernate Template
>bean id="hibernateTemplate1"
class="org.springframework.orm.hibernate3.HibernateTemplate"<
>property name="sessionFactory"<
>ref bean="mySessionFactory"/<
>/property<
>/bean<
Now Inject Hibernate Template into MyHibernateTemplateImpl
>bean name="hibernateSess" class="org.myService.service.impl.hibernate.MyHibernateTemplateImpl"<
>property name="hibernTemplate" ref="hibernateTemplate1"<>/property<
>/bean<
>!-- Defining the Implementation of the OSGi Service and also Injecting following things: -
1. OSGi Bundle Context
2. Now Inject MyHibernateTemplateImpl into your Spring OSGi Service
--<
>bean name="firstService" class="org.myService.service.impl.TestFirstOSGiServiceImpl" <
>property name="bundleContext" ref="bundleContext"/<
>property name="sess" ref="hibernateSess"<>/property<
>/bean<
OSGi as I already said is pretty strict in its class loading Policies. It is So strict that even the OSGi container running within the Jboss OSGi container cannot access the libraries in the classpath of Appservers.
So you will be able to look up the JNDi exposed by jboss, in the same fashion as you look up any other service which is exposed outside the App-servers.
Though looking up the Objects registered within the JNDi is easy but typecasting (de-serializing) those Objects into the required classes required few of the Jboss Appserver jar files to be available withing the jboss OSGi container.
1. jboss-integration.jar
2. jboss-remoting.jar
3. jboss-security-spi.jar
4. jboss-serialization.jar
5. jboss.jar
6. jbosscx-client.jar
So for doing this we have 2 options: -
1. Either we convert all these jar files as OSGi bundles and deploy them with your Bundle
2. package these Jar files with the Application Bundle generated by the Eclipse

I did the #2 and packaged all the required Jar files with my Application bundle itself.
Thread t = new Thread(new Runnable() {
boolean registered = false;
ServiceReference ref = null;
int safety = 0;
public void run() {
while (!registered amp;amp; safety > 10) {
System.out.println("Trying to get the reference to FirstOSGiService");
ref = bCtx.getServiceReference(TestFirstOSGiService.class.getName());
if (ref != null) {
break;
}
try {
Thread.sleep(100);
} catch (InterruptedException e) {
}
safety++;
}
if (ref == null) {
System.out.println("Service TestFirstOSGiService not registered");
} else {
System.out.println("Found service");
TestFirstOSGiService service = (TestFirstOSGiService) bCtx.getService(ref);
System.out.println("Retrieved service TestFirstOSGiService");
System.out.println(service.getName("Sumit"));
}
}
});
t.start();
Appendix: -
- (1)Components are often termed as bundles in the OSGi World
- (2)Follow this Link which guides to convert the Simple jar files in Bundles
Resources: -
- Spring Enterprise Bundle repository
- Jboss OSGi
- Eclipse, Spring, Maven integration
- OSGi With Eclipse
- Other OSGi Resources and its Specifications


4 comments:
Cool Waiting .. ;)
hi Vikas,
It took a bit time but it is available now :)
Man .. Excellent .. Wonderful .. I will bookmark your site and take the feeds additionallyI'm satisfied to seek out numerous useful information right here within the publish, we need develop extra techniques on this regard, thanks for sharing. . . . . .
very good!
Post a Comment